Friday, June 29, 2012

Clipboards and Craft Sticks

Jazzing up clipboards is all over the teaching blogs and mine definitely needed some updating!!  I got the idea to use scrapbooking paper and mod podge from Dana at Fun in 1st Grade.


So here is the before shot:


They look pretty ratty from all the marker, pencil and crayon marks on them.  I picked out some cute scrapbooking paper that I had in the back of my bedroom closet and then measured and cut the paper, rounding the corners and cutting a notch at the top.


Using the first one as a template, I cut the rest of the paper and then spray glued it to the clipboard.  (**Take note!!  Do not do these things while using spray glue:  pet dog, wipe nose or go potty.  Take it from me!)


Carefully apply the paper to the clipboard, trying to smooth out the bumps.  Then use Mod Podge to seal and protect the paper and the clipboard.  I used 2 thin coats, waiting about 15 minutes in between coats to let it dry.
 
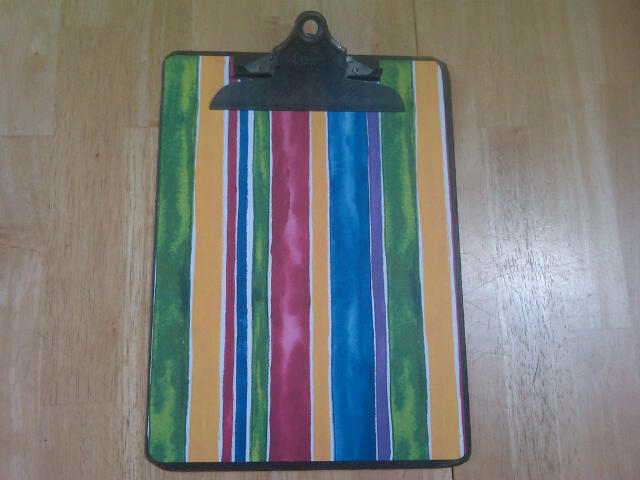
And voila!!  Here are the finished clipboards!!  I made two of each kind.  I’ll use these to make partners, choose volunteers to demo a game or for choosing kids to leave the carpet and get started on their work.  So for example, I’ll say, “If you have the ladybug clipboards, you’re partners today.”  Or, if you have the watermelon clipboards, come up and show us your work.”

Another way that I make it fair when calling on kids is to have craft sticks with their initials on them.

I use these for reminding myself who has had a turn to answer questions, had a turn to share, or also for making partners and choosing kids to go to their desk and start working.  Happy Crafting!

Melissa


Thursday, June 28, 2012

Organizing Math Materials


I'm reading Math Work Stations by Debbie Diller and totally loving it!

In Chapter 2- Organizing and Managing Math Materials, she suggests taking out all your math stuff and make it easier to find.  Think of the acronym S.P.A.C.E. created by Julie Morgenstern.

  1. Sorting your stuff- take EVERYTHING out.  I thought that I had all my math materials organized, but I kept finding more things in all corners of my classroom!  Take them out of their container and put them in piles according to your math units. (I wish I had a picture of my classroom to show you this step.  Imagine all the furniture pushed to one side of the room and then EVERY BIT OF FLOOR SPACE covered with papers, books, manipulatives and empty containers.  Ugh)
  2. Purging- very hard to do.  I filled two of the big custodian trash cans and took several trips to empty my recycling bin.  However, I felt really good about what I had done. (BTW- this whole process took 8 hours!)   (ha ha!  No, I didn't throw away any students!)
  3. Assign a Home- once I had everything sorted and trimmed down, I could look at the piles and see what size and type of container I'd need to hold it all.  I was really tempted to go out and buy all new, matching containers, but I listened to Debbie Diller and just used what I had.  I had tons of empty containers from when I started sorting.  At this point, I realized that the cupboard where I had been keeping them was not the best one.  I needed to move cupboards, which meant taking everything that was currently in that cupboard and moving it!!  Gah!
  4. Containerize!  Finally, a step that I liked.  I started with my biggest pile- Measurement- and worked my way through the 12 piles until they were all in labeled containers.
  5. Equalize- this step is ongoing, evaluate as the school year goes on what is working and what isn't.


It was a lot of work, but soooo worth it!!  Now when I go to set up my math work stations, everything will be together! 

I saw this on Pinterest from Molly at Lessons with Laughter and loved it!!  


No more dice flying around the room!!


Melissa